The Quilt Ladies Weekly News

Quilts in all Forms

This week has been all about color, paint, and petals! I finally finished my Flower Quilt Painting, a bright mix of blooms and patterns inspired by the fabrics I’ve been stitching with lately. It’s a little bit quilt, a little bit garden and completely full of joy. And…I could do it sitting down and NO noise, this cold has knotted me down.  Plus, I need something just for me !

the quilt ladies weekly news from beth ann

Okay, I LOVE my library/office. This was our 2025 first project, Husband’s Doc said, “Go live your life, did it before? Do it now”. HERE  On the drive home Husband said, “Well, what about that library you want to build?” And I was off, we did all of the work ourselves! And 100% pissed off our HOA and I have not ONE problem with any of it !
(This OLD Quilter, Never, they don’t know me at all)

pink quilted flower in white vase by Beth Ann Strub

I walk into this room just to LOOK, IT’s ME!
My Art, My Desk, My Ideas. I love this room!
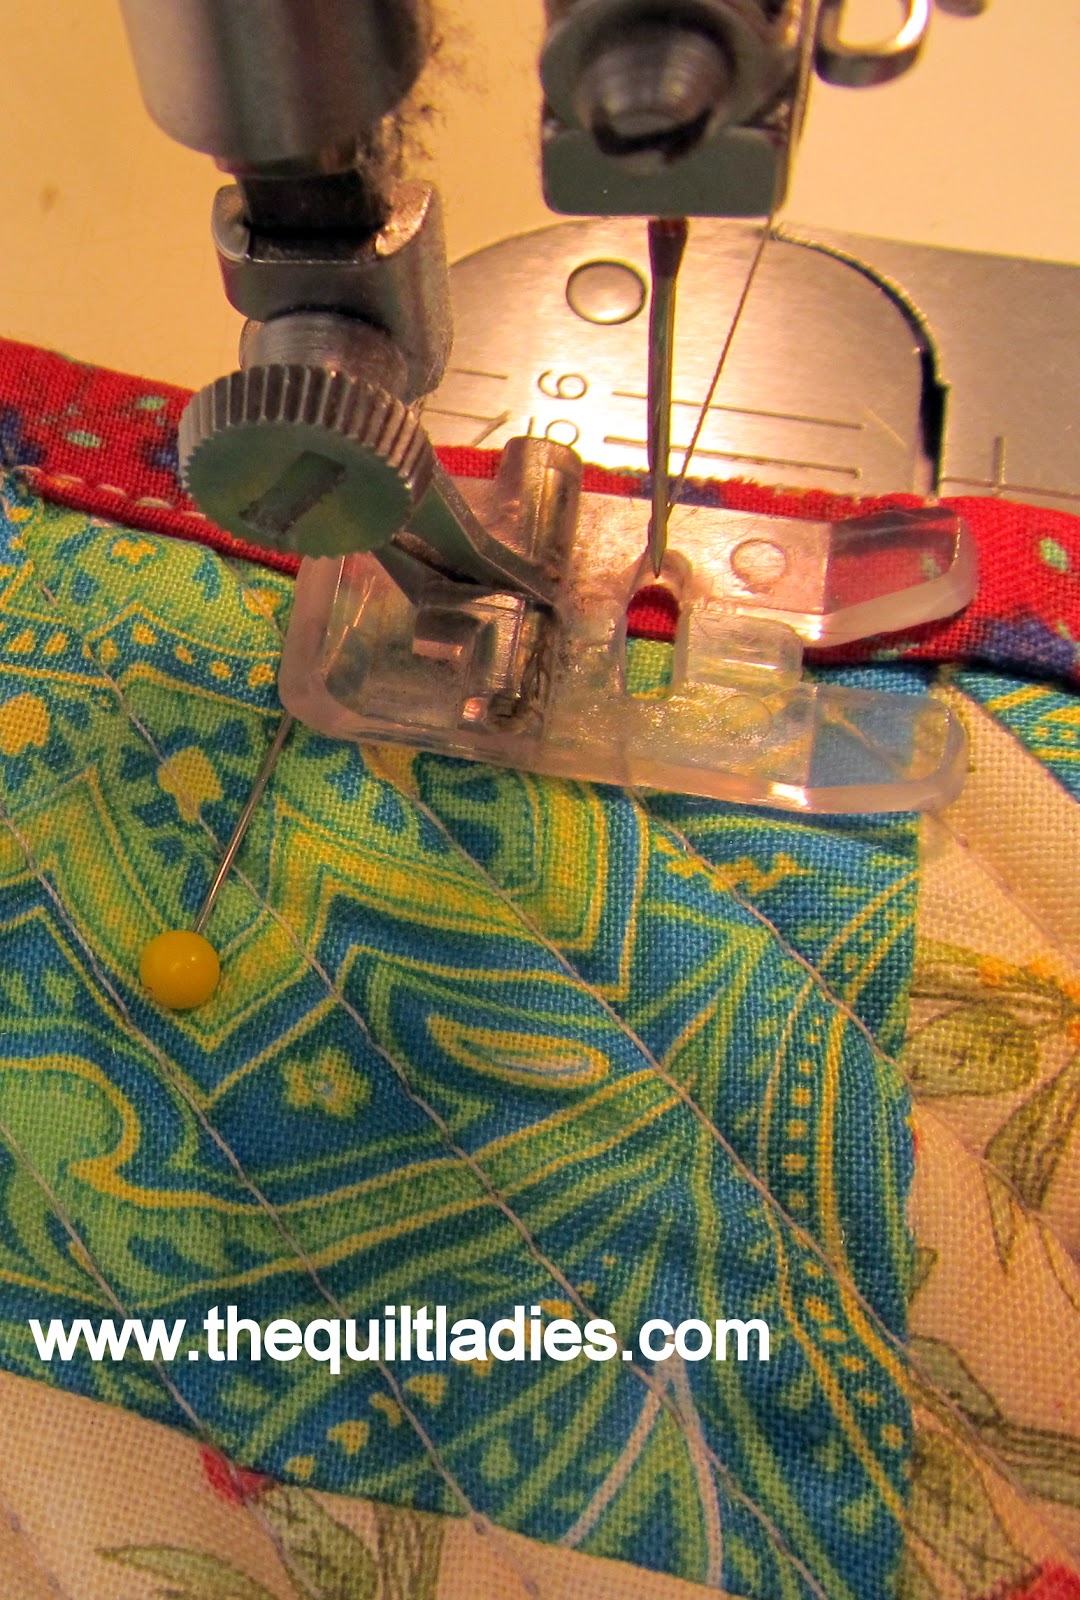
quilted painted flowers from The Quilt Ladies

Quilted flowers in vase

the quilt ladies painting up close

Quilt Block to Make

free quilt block from The Quilt Ladies

English Rose Quilt Block Pattern for you to make

Let’s try a Flower quilt block, full of blooms are in the fabric, kind a like the painting. Complete Quilt Pattern HERE

The Quilt Ladies Book Nook

The Original Quilt Ladies Quilt Patterns in ONE place, ONE book

This week’s It’s ALL The Quilt Ladies Quilt Patterns in ONE book ! 
Eleven complete quilt patterns, How to Hand Applique, How to Fusible Applique  and a Getting Stated Section    HERE 124 Pages of Quilt Patterns, quilt instructions, and quilt memories for you to make.

     Thought for the Week

“Let color be your courage this week.”
Paint it, piece it, or simply live it, with laughter, love and JOY

Until next time,
Beth Ann
The Quilt Ladies
www.BethAnnDoing.com

Thank you for supporting my Etsy shop and my Quilt Ladies Book

SEE Beth Ann’s BOOKS on Amazon and
PDF download quilt patterns on Etsy

Log Cabin Quilt – Quilt Tub Find ?!?!?!?

Tuesday Thread Quilts

I pulled out binding for quilts the other day and of course found quilts awaiting….
This is a baby quilt I made just to use up fun scraps, probably was to be a post here or eBook???? Have NO Clue. What or Why I made it…maybe the fabric?
Where do you keep your what needs finished quilts? I have tubs I am NOT ready to share how many tubs….but I will share….I have drawers full too !
Tuesday Thread my Quilts
Strips are cut 1 1/2″ and I did the piecing on a sewing machine.

quilt ladies quilts

quilt ladies quilts

quilt ladies quilts

Beth Ann of The Quilt Ladies
Beth Ann

SEE Beth Ann’s BOOKS on Amazon and
PDF download quilt patterns on Etsy

How to Mend a Quilt Tutorial

Tuesday Thread how to Quilt

I’m always on the look out for old quilts and IF I think I can save them I purchase them. They have to be washable and usable, nothing better to me no matter the temperature is a quilt to cuddle in. This is the Quilt AFTER, I am sharing this from my Quilt Ladies site, this post is NUTS on Pinterest !
how to mend an old quilt

3 blocks that needed attention, 
I ALWAYS wash and dry quilts before I mend, this one turned out 
VERY nice, they usually do !

mending an old quilt how toI like making a paper temple for the applique piece I’m adding
free how to mend an old quiltTry to make it exact and add seam allowance at the time of cutting (it’s easier to do)
how to mend an old quilt tutorialThis is the same fabric, one is the right side 
and one it the back side, I used the back.
how to mend an old quilt Add the seam allowance and cut out piece how to mend an old quilt
how to mend an old quiltFold down the point and press
how to mend an old quiltFold the sides over, I like to press everything and I use the tip of the small scissors to hold as the fabric will get HOT !tutorial how to mend an old quilt
how to mend an old quiltApplique the pink down and I then hand quilted, forgot to picture !
how to mend an old quilt

how to mend an old quilt3 baskets I fixed on this quilt

Can you find them ?
how to mend an old quilt
Beth Ann of The Quilt Ladies
See All I do at My Shop’s – click below

SEE Beth Ann’s BOOKS on Amazon and

PDF download quilt patterns on Etsy

The Quilt Ladies and Beth Ann

Self-Binding Tutorial of a Quilt

Tuesday Thread How to Quilt

Self-Binding Quilt Tutorial
Self Binding means: 
Bring the quilt backing to the front and using it as your binding, I am bring this over from The Quilt Ladies, this post is used and asked for all the time, Thank you for that.
Just a few days ago I received this comment on my original post:
from Helen:

After reading the tutorial 3 times I committed to try it.
It worked perfectly. I just followed the instructions and it worked
on a table runner. This method stops so much waste of material.

See all MY Books in PRINT HERE
Step by Step How to do Self Binding on a Quilt Make your quilt block, add batting heat resistant, and quilt. Trim the batting even with your quilt top
How to do Self Binding on a QuiltCut one backing 1″ from the quilt edge

How to do Self Binding on a QuiltFold the backing to the edge of the quilt, 1/2″, I like to press it down

How to do Self Binding on a Quilt
Again, fold the backing over onto the quilt top, make sure you are on the quilt top with the edge, this is your sewing edge, pin it down
Self-Binding Quilt Tutorial from The Quilt LadiesAnd then do the steps as before, 
fold over half way and
then fold over half way again. 
Pin well.
Self-Binding Quilt Tutorial from The Quilt LadiesSometimes at the corner you will have to move it around a bit
to make the corner perfect, go slow and pin well. 
Self-Binding Quilt Tutorial from The Quilt LadiesWhen I get it like, I like,  pin and I press a bit, between pins and at the corner
it holds it just a bit better. 
Remember, pressing is up and down with an iron. 
Doing it up and down your fabric will not stretch or move.
With your machine sew along the backing edge, do a few back stitches to hold ends

Self-Binding Quilt Tutorial from The Quilt LadiesI like doing 2 rows of stitching, just my personal like.

Self-Binding Quilt Tutorial from The Quilt Ladies

Beth Ann of The Quilt Ladies

How to Make Bias Tape

Tuesday Thread – The Quilt Ladies

 Bias Tape is NOT hard to make and you don’t need to purchase anything you will need 
Beth Ann of The Quilt Ladies
See all The Quilt Ladies Do
2 Straight Pins
1 Piece of fabric cut 1″ x 3″  – (dark green) Holding Strip
 
The strip (light color) you will make into bias tape, I cut mine large to show, normal cut will be 3/4″ to 1 1/4″ wide. 
 
Bias Tape the OLD Fashion Way

How to make Bias Tape Iron over your edges, 1/8″ to 1/4″ and Press in, do about 2-3 inches, enough to hold and pull through

How to make Bias Tape the OLD Fashion WayDo both sides/edges
How to make Bias TapeLay your started binding down, pressed side up.
Take your Holding Strip and lay on top, Pin into your ironing board cover next to the bias tape.
How to make Bias Tape the OLD Fashion WayPull the bias tape
How to make Bias Tape And, with a hot, dry iron press, at first do a bit, and lift iron, pull and iron.
How to make Bias Tape the OLD Fashion Way
As the tape becomes longer you can leave the iron and pull slowly.
(Other side view)
How to make Bias Tape the OLD Fashion WayPull tape slowly
How to make Bias TapeGood side of bias tape.
How to make Bias TapeI like to roll mine  to keep it until I’m ready to use it.
I learned this years ago from a Home Eco. teacher in the 70’s
No need to buy a machine to do this for you !  But, you can if you like !


2025 Monthly Quilt Patterns from The Quilt Ladies
See All my Quilt Ladies Patterns at my Etsy Shop

Thank you for supporting my Etsy shop and my Quilt Ladies Book

SEE Beth Ann’s BOOKS on Amazon and
PDF download quilt patterns on Etsy

#tuesdaythread, #biastape, #howtoquilt

How to Tie a Quilt with Yarn

A Quilt Tradition

How to Tie a Quilt with Yarn
To tie a quilt is a quick way to finish a quilt which is to be loved and used.
As with everything, there are a few ways of doing a tied quilt, this is the way “I” do it.  
How to tie a quilt with The Quilt Ladies

Please like, pin and share, and stop over at my shop to see all I do.
The Quilt Ladies Quilt Pattern Shop

or See all my Books in Print, eBooks

How to tie a quilt using yarn I use these needles, sometimes a larger one and sometimes not. After doing them I really think it’s how I feel that day ! 
How to tie a quilt using yarnI like to use, “Peaches and Cream” yarn, soft but NOT TOO soft, it has to be to hold the knot. 

How to tie a quilt using yarn

 I like my cutting mat UNDER the quilt, so I don’t push through and chip my table top.

How to tie a quilt using yarn

Cut yarn about 30 inches long one thickness. 

From the side you will see the knot, go down and up, going though, top, batting and backing. 

How to tie a quilt using yarn

Pull needle through, leave about a 2 inch tail form the first knot.

How to tie a quilt using yarn Come back through again,
How to tie a quilt using yarn DO NOT cut yarn, travel to next knot and repeat. 

How to tie a quilt using yarn

How to tie a quilt using yarnCut yarn 

How to tie a quilt using yarn I do all the knots and then cut them all at the same time.

How to tie a quilt using yarnAs I tie each one, I lay the yarn going down. 
How to tie a quilt using yarn

Cut ends to about 1/2″ to 3/4″ is way YOU like

How to tie a quilt using yarn

See all my Books and Quilt Book on Amazon

Thank you for supporting my Etsy shop and my Quilt Ladies Book on Kindle and Nook, nothing is possible without your purchases, Beth

The Quilt Ladies ONLY on Kindle 

The Quilt Ladies Quilt Pattern Etsy Shop HERE for YOU

#tieaquilt #bethanndoing #finishaquilt

How to Make Center Squares and Triangle Corner Square Quilt Blocks

Tuesday Thread – Quilt How to

Beth Ann of The Quilt Ladies
The Center triangle quilt block is all about sewing your triangles on to opposite sides, turn and sew opposite sides.

FYI: I am a little generous with my cutting of the triangles, you can always cut them, sew and trim, to the 1/4″ seam allowance.

Center Square
how to make a center square quilt block
Cut your Squares and then triangles as stated in the pattern.
Sew on the top triangle, Trim the ends even.
Sew on the bottom Triangle, Trim the ends.
Note:
sewing the pieces across make the square lay flat, as does trimming the ends.
Sew on the side triangles.
Trim the quilt block making sure to leave the 1/4” seam allowance. 
Press
 
how to make a center square quilt block
center square quilt block cutting chart
Center Square Cutting Guide


how to make a quilt block with triangle cornersTriangle Corners  Adding Triangle to corner unit
 
Cut your Squares into triangles as stated in the pattern.
Sew triangles (finished size plus 7/8″) to square or triangle block,
trim and press.
Cut your Squares (finished size plus 7/8″)and then into triangles as
stated in the pattern
Place the good-side of fabric to good-side of
fabric, sew from corner to corner.
Using a 1/4” seam allowance, trim, press to larger triangle. 
corner triangle added to quilt block
Beth Ann’s Quilts and Flowers
#quilt #quilting #thequiltladies #patchwork #bethanndoing #quilts #needlework

How to Sew a Quarter Square Triangle

Join Us For Tuesday Threads

It’s Tuesday Thread,  where I am breaking down quilting techniques one stitch at a time!

Join us Each Tuesday
Today, is the quarter square triangles, those clever little pieces that add movement quilt blocks. Sometimes called hourglass units, these triangles are made by combining two half square triangles and then slicing again. They’re perfect for stars, pinwheels, and any design that needs a touch of symmetry and flair.
I am taking the mystery away and showing you how to do it easily.
We have made a square, a triangle and some basic quilt info.  NOW it’s time for some FUN quilt block patterns. Don’t over think these, just step by step.

how to make a quarter square triangleQuarter Square Triangle


The Quilt Ladies teach you how to quilt.
Cut 2 squares, 1 each color – your squares needs to be cut 1 ¼” larger than the
finished size you need, 
example you need a 4” finished square cut square
5 ¼” x 5 ¼”
On lightest color on the back, pencil mark from corner to corner.
Sew ¼” from the line, on each side of the line.
With scissors cut on each of the 2 lines, open up, move the match colors, pin and sew you will have 2 blocks

The Quilt Ladies teach you how to quilt.
Beth Ann’s The Quilt Ladies
#quilt #quilting #thequiltladies #patchwork #bethanndoing #quilts #needlework

Hand Sewing a Quilt Block – Tuesday Thread

Hand Sew a Quilt Block

Let’s do some hand piecing of a quilt block 

I hand piece or hand quilt EVERY Monday at my small group quilting group. Really…I’m just to lazy to get my sewing machine carried in and set up, plus then I couldn’t walk over. A new member arrived last Monday and she asked LOTS of questions about hand piecing.
So, I’m re-posting my basic hand piecing class

I feel all quilter’s should at some time do hand piecing, I know you think I’m nuts, but it brings me back to the tradition of what quilters are all about. I try to do one every year or so. Your piece need not be a huge project, but please, try it.

This is my travel quilt box, would you believe it’s an old Ethel M Chocolate box from Las Vegas about 35 years ago. It has everything but scissors, you just can’t travel with them anymore. I have gotten into the habit of keeping it all together. This box has been on many vacations, fishing trips and even at baseball/football games in many towns, when the boys still lived with us.

hand piece a quiltCut an assortment of fabric, 
For one block you will need
8 – 1 1/2″ x 1 1/2″
and
4 – 2 1/2″ x 1 1/2″
I just cut a pile of each and put the colors together as I piece.
marking lines to hand make a quilt
 
Mark a 1/4″ seam line on fabric back, I use a ruler and pencil.
 
hand stitch a quilt
 
Knot your thread and do a rocking stitch. After a bit you will not need the line, notice my thumb,
 I use it as my measurement guide, some add a mark on their nail, but I don’t like messing up my nails, aka manicure !
 
how to hand piece a quilt block
 
I use a thread about 18-20 inches long and string piece, knotting at the beginning and end of each block. Finger piece them open.
 
sewing a quilt by hand
Draw seam line if needed. Place good fabric to good, pin and sew.
how to hand piece a quilt
Open and finger press. Add 2 1/2″ x 1 1/2′ to side.
how to piece a quilt
Draw sewing line, Pin and sew on line,
hand piece a quilt
Finger press to the outside.
 
how to hand piece a quilt block
 Take 2 1/2″ x 1 1/2″ and draw sewing line on each end, sew to 1 1/2″ x 1 1/2″ Do 2 times.
how to hand piece a quilt block
Draw seam line if needed. Place good fabric to good, pin and sew.  
how to hand piece a quilt block
 This is the back of my hand pieced block. 
how to hand piece a quilt
 
Two finished blocks, each block has a finished size of 4″
 
Take some time, don’t take it all too serious, pick a comfy chair, good light and just have some HAND piecing fun.
Thank you for supporting my Etsy shop and my Quilt Ladies Book
SEE Beth Ann’s BOOKS on Amazon and
PDF download quilt patterns on Etsy
 

How to Quilt – Basic Need to Knows

Tuesday Thread – Quilt Information

Here is a bit of info that will make starting to quilt a little easier.  Quilt sizes, fabric sizes and if you missed it how to sew a basic square and triangle quilt block. 

Beth Ann of The Quilt Ladies
Standard Cut Sizes of Fabric
Fat Quarter – 18” x 22”
Fat Eighth – 9” x 22”
Fat Sixteenth – 4 ½” x 22”
1 Yards is 36” x 44-45 ”(width may be different per
fabric company)
Standard Mattress Sizes
Crib – 23’ x 46’ or 28” x 52”
Twin Single – 39” x 75”
Double/Full – 54” x 75”
Queen – 60” x 80”
King – 76” x 80” or 78” x 80”
Standard Batting Sizes
Crib Size – 45’ x 60”
Twin – 72” x 90”
Double/Full – 81” x 96”
Queen – 90” x 108”
King 120” x 120”

IF you missed it here are the TWO basic Quilt blocks again ! 

There are MANY ways to piece quilt blocks,
I’m sharing the way I like to do it.
Squares 
Cut 2 – 2 ½” x 2 ½” squares the same size (finished size of square plus 1/2 inch)
Good to good Fabric
¼ inch seam allowance, sew
Trim threads
Open and Press to the dark  – My How to do this
how to quilt with The Quilt Ladies
Triangles
Cut 2- 2 7/8” x 2 7/8” Squares
(finished size
plus 7/8”)
Good to good fabric, with a pencil draw a line corner to
corner, this is
The line you measure your ¼” seam allowance from
Sew from edge to edge use a ¼” seam
Cut in half on the pencil line, trim threads
Open and press to the dark fabric,
There will be 2 blocks – My How to do this
Cutting Chart for Half-Square Triangles
Learn how to quilt with The Quilt Ladies

#quilt #quilting #thequiltladies #patchwork #bethanndoing #quilts #needlework