Bring the quilt backing to the front and using it as your binding, I am bring this over from The Quilt Ladies, this post is used and asked for all the time, Thank you for that.
Just a few days ago I received this comment on my original post:
from Helen:
After reading the tutorial 3 times I committed to try it. It worked perfectly. I just followed the instructions and it worked on a table runner. This method stops so much waste of material.
Iron over your edges, 1/8″ to 1/4″ and Press in, do about 2-3 inches, enough to hold and pull through
Do both sides/edges
Lay your started binding down, pressed side up. Take your Holding Strip and lay on top, Pin into your ironing board cover next to the bias tape.
Pull the bias tape
And, with a hot, dry iron press, at first do a bit, and lift iron, pull and iron.
As the tape becomes longer you can leave the iron and pull slowly. (Other side view)
Pull tape slowly
Good side of bias tape.
I like to roll mine to keep it until I’m ready to use it. I learned this years ago from a Home Eco. teacher in the 70’s No need to buy a machine to do this for you ! But, you can if you like !
See All my Quilt Ladies Patterns at my Etsy Shop
Thank you for supporting my Etsy shop and my Quilt Ladies Book
I hand piece or hand quilt EVERY Monday at my small group quilting group. Really…I’m just to lazy to get my sewing machine carried in and set up, plus then I couldn’t walk over. A new member arrived last Monday and she asked LOTS of questions about hand piecing. So, I’m re-posting my basic hand piecing class
I feel all quilter’s should at some time do hand piecing, I know you think I’m nuts, but it brings me back to the tradition of what quilters are all about. I try to do one every year or so. Your piece need not be a huge project, but please, try it.
This is my travel quilt box, would you believe it’s an old Ethel M Chocolate box from Las Vegas about 35 years ago. It has everything but scissors, you just can’t travel with them anymore. I have gotten into the habit of keeping it all together. This box has been on many vacations, fishing trips and even at baseball/football games in many towns, when the boys still lived with us.
Cut an assortment of fabric,
For one block you will need
8 – 1 1/2″ x 1 1/2″
and
4 – 2 1/2″ x 1 1/2″
I just cut a pile of each and put the colors together as I piece.
Mark a 1/4″ seam line on fabric back, I use a ruler and pencil.
Knot your thread and do a rocking stitch. After a bit you will not need the line, notice my thumb,
I use it as my measurement guide, some add a mark on their nail, but I don’t like messing up my nails, aka manicure !
I use a thread about 18-20 inches long and string piece, knotting at the beginning and end of each block. Finger piece them open.
Draw seam line if needed. Place good fabric to good, pin and sew.
Open and finger press. Add 2 1/2″ x 1 1/2′ to side.
Draw sewing line, Pin and sew on line,
Finger press to the outside.
Take 2 1/2″ x 1 1/2″ and draw sewing line on each end, sew to 1 1/2″ x 1 1/2″ Do 2 times.
Draw seam line if needed. Place good fabric to good, pin and sew.
This is the back of my hand pieced block.
Two finished blocks, each block has a finished size of 4″
Take some time, don’t take it all too serious, pick a comfy chair, good light and just have some HAND piecing fun.
Thank you for supporting my Etsy shop and my Quilt Ladies Book
Here is a bit of info that will make starting to quilt a little easier. Quilt sizes, fabric sizes and if you missed it how to sew a basic square and triangle quilt block.
Beth Ann of The Quilt Ladies
Standard Cut Sizes of Fabric
Fat Quarter – 18” x 22”
Fat Eighth – 9” x 22”
Fat Sixteenth – 4 ½” x 22”
1 Yards is 36” x 44-45 ”(width may be different per
fabric company)
Standard Mattress Sizes
Crib – 23’ x 46’ or 28” x 52”
Twin Single – 39” x 75”
Double/Full – 54” x 75”
Queen – 60” x 80”
King – 76” x 80” or 78” x 80”
Standard Batting Sizes
Crib Size – 45’ x 60”
Twin – 72” x 90”
Double/Full – 81” x 96”
Queen – 90” x 108”
King 120” x 120”
IF you missed it here are the TWO basic Quilt blocks again !
There are MANY ways to piece quilt blocks,
I’m sharing the way I like to do it.
Squares
Cut 2 – 2 ½” x 2 ½” squares the same size (finished size of square plus 1/2 inch)
Tuesday Thread, Let’s start to Sew that Quilt Block
Always remember that quilting has been done for hundreds of years and all the new gadgets are great. You can still do things very simply and fill your sewing closet with new innovations as your talent grows.
No need to purchase a rotary cutter and mat your first time out. Take your time and enjoy the sewing process.
My Quilt Patterns on Etsy, and NOW on Amazon
Things needed to start a quilt project:
A sewing machine that sews a straight line, borrow one or purchase one at a large chain store. No need to spend hundreds/thousands on a machine to straight stitch. OR Hand piecing can be done too. Everything is the same as a machine, but you hand stitch using the same ¼” seam allowance. I will share how to soon.
1)Graph Paper 2)Freezer Paper – Plastic coated paper, like the butcher’s wrap meat in. You can purchase it at your local store or if you ask they may give you some at your butcher counter 3)Glue stick 4)Iron 5)Gray thread 6)Ruler 7)Pencil 8)Basic sewing supplies, Scissors, thimble, sew riper, etc. 9)Needles – for hand piecing Sharps size 7-12, for quilting Between needles size 10-12 10)Sewing Pins 11) Fabric and Batting
Cutting – Rotary cutter, mat and ruler can be used if you have them. If you are new to quilting and are not sure you want to buy all these supplies try Freezer paper. It may be purchased at any grocery store. You will notice that one side is shiny, one not.
Draw the pattern pieces on to graph paper, the finished size, Add a ¼ inch seam allowance around the entire outside edge –the cutting line, the – – – line. The – – – – will be the sewing line
(example – 2 inch finished size cut square 2 ½” x 2 ½”) Cut pattern out
With a glue stick. Paste the pieces to the NON-shiny side of the freezer paper.
Cut the pattern out.
You can now iron the pattern to your fabric, shiny side down. This pattern can be used over and over. It will leave no film on your fabric.
At this point in quilting classes, it’s time to make a quilt block! Use the method, ruler/cutter or freezer paper.
Here is how to make a quilt square – A 4-patch quilt block
Cut 2 squares the same size (finished size of square plus 1/2 inch) example cut 2 ½ x 2 1/2″ inch seam allowance, sew Good side of fabric to good side of fabric Trim threads Open and Press to the dark
1)sew seam with a 1/4 inch seam allowance,
you may need to mark your machine with this measurement.
2) You can chain piece a few at a time Cut thread and open
3)sew these together
Watch your color placement, sew good side to good side.
Fabric colors are always on a Quilter’s mind, And here is the way that I was taught, years and years ago. Last Week I shared how I do color using a photo, post is here for you.
1) Start with one fabric. Take this one fabric and work from it. Is that one fabric, a dark, medium or light color?
This is a Dark
Add the light and medium. Move and change it until you like it.
Lay them out in front of you.
Then add, a dark medium, a light medium, until you have the mix of what you like.
2) Choose colors and patterns you love. An average a twin size quilt will take me about a week to piece together, and if hand quilted another, 3-4 months. If tied or machine quilted 3-4 weeks, you have so much time and cost involved you have to love it.
3) Natural or background colors. These are the corner stone. More often than not the background color is your light color. Your background color helps bring the blocks together. It does not always need to be a light either, dark or medium work well to, any color can be used.
4) Color Wheel. I’m not a big fan of the color wheel, I do like when colors pops and on most of my quilts the start fabric is not the most prominent color used it in, it is just a starting point.
5) Make one block. This should always be done, a Quilters practice, cut only fabric for one block and live with it for a few days. Especially, if it’s something you’ve never tried before. Most times you will know right away if you like it or not.
6) Have fun. This is the best way I’ve found to pick colors, enjoy the process, your quilt will be fantastic.
Last week we learned to use freezer paper and made a 4-patch quilt block, today let me share how to make a triangle quilt block.
Beth Ann is The Quilt Ladies
Many quilt blocks start with squares and triangles and this is the way I learned to do they SO many years ago. Of course there are new methods, do and use what you like, you do YOU! My Books in Print on Amazon My Etsy Shop
How to make Triangles Take the finished size, add 7/8″ to it and that’s the size you cut your square. You want a FINISHED size Quilt Block of 2 inches, you cut the fabric 2 7/8″ to get it. etc. etc. (if using freezer paper cut it example: 2 7/8″ x 2 7/8″)
Place good side of fabric to good side of fabric,
with a pencil draw a line corner to corner, this is The line you measure your ¼” seam allowance from Sew from edge to edge use a ¼” seam Cut in half on the pencil line, trim threads Open and press to the dark fabric, There will be 2 blocks
This may seem a bit strange, but I love the colors in this dress, it’s from a Vogue magazine probably 6-8 years ago, (LOVE IT) and it’s how I picked the colors for my quilt B. Annie
This quilt post has been used and shared of years it really does work.
I do have to say that after all these many years, I don’t over think color anymore. I have used some real dog of fabrics and when it’s all together…the quilt seems to work on it’s own.
One of the best things about quilting is the Wonderful Fabric’s you get to purchase, lots and lots of fabric. Sign up top right of this site to receive notice of new posts, I will NEVER send a newsletter, etc. I just don’t like them!?!
And with that I have to add,
This is the way I do my fabric, you do you ! Purchasing fabric is fun, please, always buy the best fabric you can afford and what you like. For quilts you will use 100% cotton fabric. Fabric will cost between $6 and $17 per yard. If you are just purchasing for a maybe project, I do mostly cuts 1 to 2 yards. If you have a quilt pattern, follow the recommendations, but as I say in my books, “Please think of purchasing more fabric than needed, as a pattern designer I have no idea how you will cut and use your fabric.” Purchased cotton yardage, I wash, dry and iron my fabric before starting any project. Please think of purchasing more fabric than needed, a pattern designer has no idea how you will cut and use your fabric.
When talking about fabric it always brings up the conversation of washing fabric. Here is what I do,
I wash and dry all my fabric BEFORE sewing cutting and piecing a quilt. You only have to pull out one finished quilt from the washer and see bleeding to know you must/should wash all fabric.
Cotton fabrics bleeding means, the dyes used on the fabric will become loose when washing. It’s said that it’s common is cottons, but all fabrics can bleed. Dyes will/can stain other fabrics in a prewashing, the biggest problem is the dye transfer after a quilt is finished. Last weeks Tuesday’s Thread HERE
When cotton fabric is made it is stretched on a loom, pulling the fibers straight. A stabilizer is applied to keep fabric straight and that is what you are washing off. Washing allows the fabric to relax and return to a more natural state. A dryer lets the fabric relax or shrink. All cotton fabrics are different you cannot know the amount any fabric will shrink.
Knowing a cotton fabric will not bleed and not shrink is worth a bit of time for the perfect quilt in the end.
When prewashing quilt fabric, I use my daily machine washer detergent, the same type that will be used when the complete quilt is washed. Same with the dryer, use the setting that will be used when the quilt is completed.
With 100% cotton fabric after washing and drying you will need to clip away all the threads that have twisted. If fabric is wrinkles you can shake it to smooth out more wrinkles, or press the fabric with a dry iron.
It’s a habit for me to wash/dry as soon as I purchase fabric. You will develop YOUR way of caring for your quilt fabrics.
When using/cutting the fabric I will press and starch it BEFORE any cutting and square up the fabric so that all cuts with a rotary cutter are straight. I use what I use for clothing as my starch just plain old Niagara brand, it makes it just a bit stiff and will washed very easily.
All this being said, “I do not EVER wash contest quilt fabric before sewing, or quilting the quilt.” That is just me, you do YOU !

 Make your quilt block, add batting heat resistant, and quilt. Trim the batting even with your quilt top
 Cut one backing 1″ from the quilt edge
 Fold the backing to the edge of the quilt, 1/2″, I like to press it down
 Fold the corner over as shown
 And then do the steps as before,
  Sometimes at the corner you will have to move it around a bit
 When I get it like, I like, pin and I press a bit, between pins and at the corner
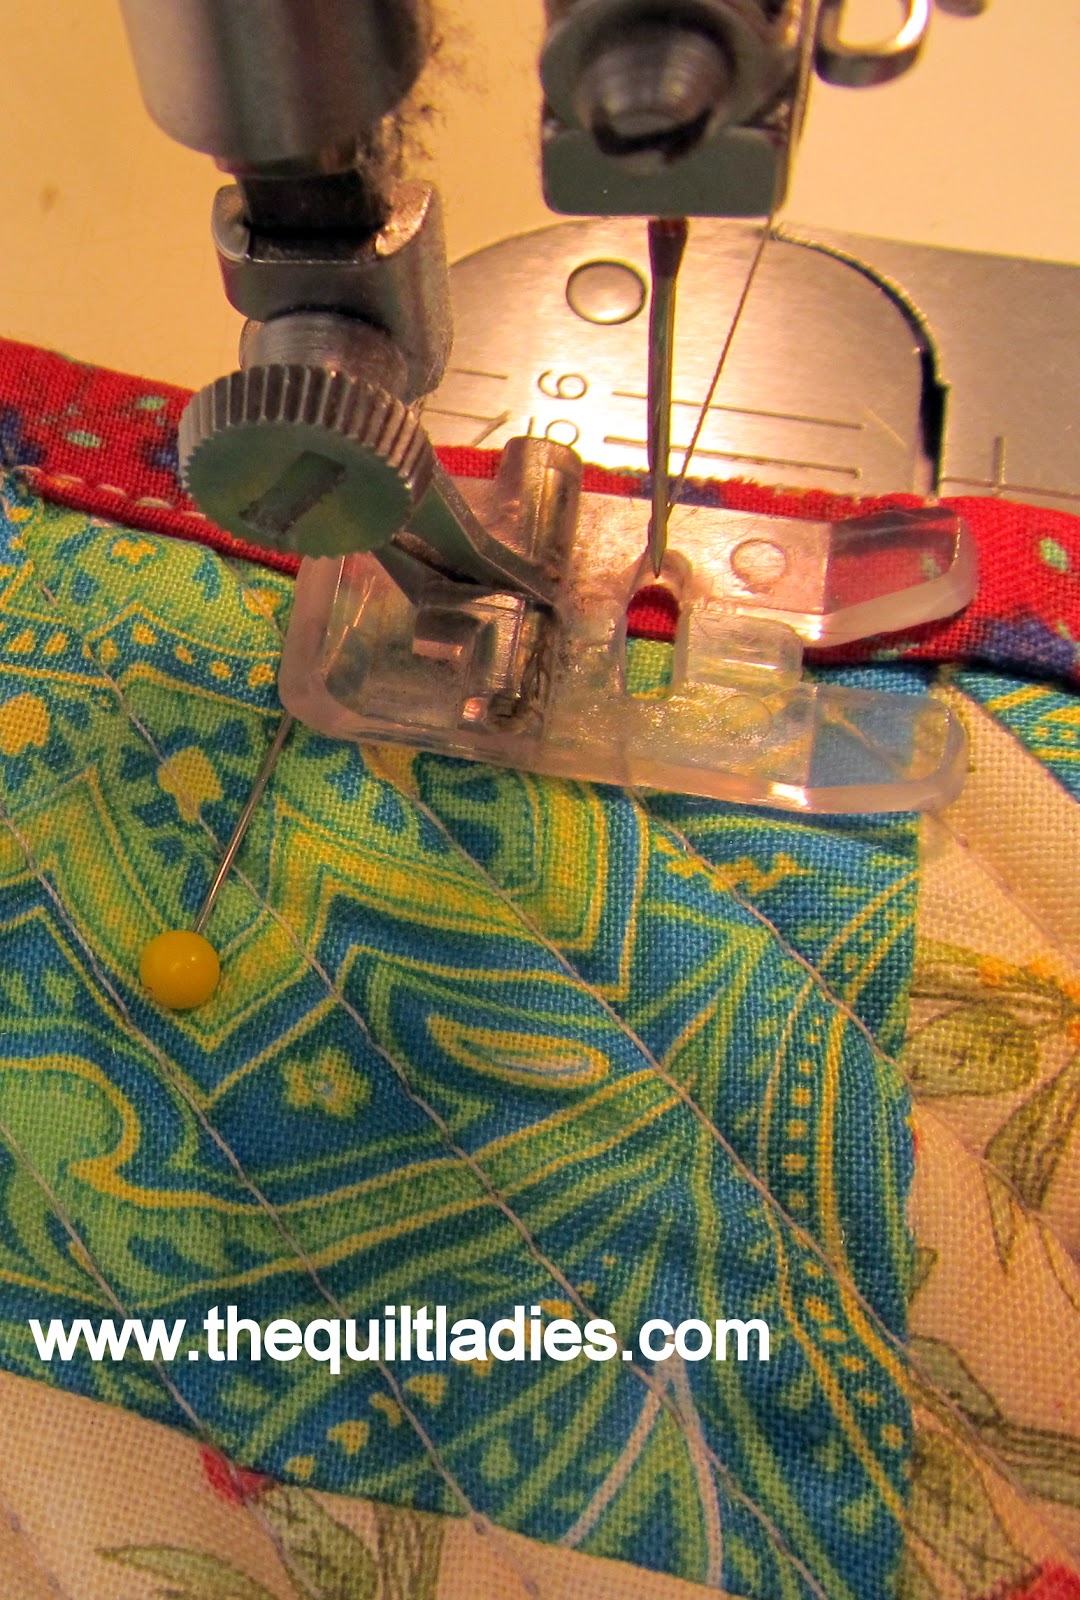
 I like doing 2 rows of stitching, just my personal like.


